Wednesday, March 14, 2012

myFINAL-LASTchapter

LAST CHAPTER


HYE! Assalamualaikum.
oryte, today i will show the video animation that we all have created.
we just maked a simple video, means, there are have certain part do not have a material, this is becoz, while rendering my laptop, always hang, so difficult to finish up the rendering process.
so thats all.hope u guys will like it...:)


thanks..:)

Sunday, March 11, 2012

myFINAL-chapterEIGHT

THE LAST PART FOR MY WORK IS 
ANIMATION
Assalamualaikum
baiklah..alhamdulillah...kesemua part yang telah ditugaskan untuk bahgaian saya, sudah hampir berakhir.
:)
explanation saya untuk part animation ini saya menggunakan 4 buah kamera. untuk memudahkan animasi video ini nanti, maksud saya mengelakkan daripada hang semasa rendering, so saya membuat walkthrough camera. jadi ianya akan lebih smooth.
insyALLAH...:)
gamba dibawah ini adalah plan kamera...


 gamba yang diatas ni adalah the starting point semasa kamera dijalankan.
setelah selesai membuat animation, kesemua video tersebuat telah saya berikan kepada fathudden untuk proses meng'edit'.


so the last entry for this FINAL PROJECT.saya akan paparkan video animasi yang telah dihantarkan kepada lecturer kami, pada 2 mac lepas..


 thanks


myFINAL-chapterSEVEN

ON MAKING THE EXISTING STREET FURNITURE 
IN AIRPORT SM


ok,assalamualaikum semua....:)
entry ni saya akan cerita kan part yang seterusnya
part ni agak rumit sikit
sebab banyak playing with the material and shape
so, agak teliti semasa membuatnya


image yang atas ni adalah antara satu material yang ssya gunakan untuk effect kayu kerusi tersebut.
yang corak-corak kat bahagian dinding tu, saya hanya gunakan tulisan yang ala-ala florid sama dengan concept yang telah saya applykan pada part lampu lobby sebelum ni.

kalau nak gunakan image dan masukkan pada bahgian tersebut, boleh, tetapiii...ianya akan nampak berbeza dan lain sikit, so its better kite gunakan cara terbaik tadi.


image 1

image 2
image 3
gamba semasa saya dan members buat research di airport SM.

image 4
so gamba yang the last ni adalah rupe sebenar selepas siap masukkan semua material.
macam mana??sama tak?:)
hope, u alls say yes...heee..:)

thanks

myFINAL-chapterSIX

ON MAKING THE PARKING LOT

Assalamualaikum

oryte, in this entry i will show to you , what i have done fo this part.
THE PARKING LOT.
if you look, it is look so simple signboard
yess! that's true, but in the whole of this project, i have arrange the divider with it, around the parking lot.
for the airprt SM, i used wood material for its stand...


that's all
:)

myFINAL-chapterFIVE

lampu di bahagian LOBBY airport SM

Assalamualaikum
oryte, untuk entry ni, saya akan ceritakan, benda apa yang saya telah inputkan ke dalam video animation untuk projek final saya bersama members group saya.
on making the lobby lamp, is the one part my work in this group.
so, untuk lampu lobby ni tak susah sangat, just a simple shape.
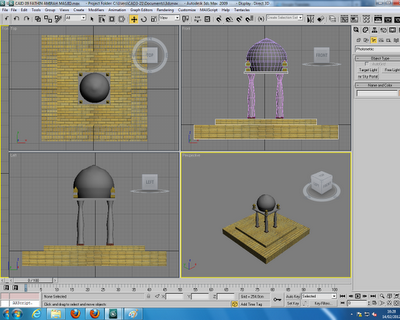
ini adalah gamba sebenar..>>>


start!..:)
step
1. gunakan tube yang ada kat standard primitive tu.

jpeg 1

2. kemudian untuk dapatkan effect yang deco kat lampu tu, kite just gune text yang ala-ala bentuk florid,(boleh download kat page dafont)
3. buat banyak-banyak dan gune kan pro-boolean, supaya mudah untuk hasilkannya serentak,so tak perlu buat one by one,jimat mase..:)
4. the last step, masukkan effect untuk surface lampu tu, tak kisahlah gune apa-apa pon, ambil image pon ok juga.untuk tak nak bagi pelik, kite gunakan image yang ada macam effect besi.
5. ha....lepas tu, kan ada banyak belung-gelung lampu tu kan...so, untuk buat seperti tu, gunakan array.
hasilnya seperti ini...:)


jpeg 2

jpeg 3
jpeg5

yang jpeg 5 ni, adalah contoh yang saya gunakan dalam effect kat lampu lobby tersebut.

sekian
thanks
wassalam..

Thursday, March 8, 2012

myFINAL-chapterFOUR

COMBINATION FROM MEMBERS.

image 01
hasil kami semua...:)

image 02

ALMOSTLY SAME....RIGHT??
hehehe..hope u say yes!..:)
nice try,we will keep it up more...
entry will be continue......
entry yang seterusnya, saya akan cerita kan apa benda-benda yang telah saya buat.


the sample video for street furniture

Assalamualaikum
here i want to share the best video of 3ds max
hehehe..is about a 'Street Furniture'
same with my main topic for this final project....:)

hope u guys will like it.
enjoy...:)


thanks..

myFINAL-chapterTHREE

RESEARCHING IN SULTAN MAHMUD INTERNATIONAL TERENGGANU 


The existing street furniture in airport.


Additional door.


Dividers at area motorcar parking.


lobby area.


the main roof of airport.


heheh..i just like to post my members group.

Many info that my friend and i had founded at the airport. the building and the structure mostly are concept of traditional of Terengganu. so unique.
show-off.

myFINAL-chapterTWO

THIS IS OUR PLAN

JPEG 01


JPEG 02

oryte..
the first image, we had create it  on A3 paper
the left side, is about telling what members must to do to complete this project
(try to large it with click on the image)
the JPEG 02 is about where the camera will be moved
so, the purple line is the way of camera...
InsyALLAH, that we had planned this one,hope the artwork it will be nice soon.

next coming
myFINAL-chapterTHREE...

anyway 
thanks
^_^


myFINAL-chapterONE

Assalamualaikum
untuk semester ni
final projek saya adalah berkait ngan bidang design furniture
so, bentuk furniture yang saya design adalah ini
the simple design

that is my trademark
i will stick it at every page of my sketches

for this entry, saya cuma tunjuk kan hasil-hasil ideation saya
proses telah saya lakukan dalam bulan November sampailah Disember

see it...:)

IDEATION


IDEA DEVELOPMENT STAGE


REFINEMENT STAGE

and this is the FINAL DESIGN
where it was selected by my lecturer Mr. Nazri


jadi, dengan design yang terakhir ni saya akan masukkan ke dalam projek
3ds max saya
dimana video yang akan di'making' ini kan nanti adalah secara berkumpulan
so, doakan saya untuk final ni, adalah yang terbaek..mekaseh.
nantikannn...:)

bytheway
thanks


Wednesday, March 7, 2012

How to make a DOME?

first of all, to make a dome by using this software
click 'Line' and make a shape such as in Image 01below.

Image 01

Next, click 'Vertex' in modify, and then right click on the yellow points to edit the line
(make smooth) and a box will appeared, then choose ' Bezier' or 'Smooth'
another step, click 'Modifier List' and click 'Lathe'.
DONE!!!

Image 02
 If the dome is not turn out such as in Image 02 , try playing the setting at the side bar.
such as change the output, or else..

Image 03
To make something better to this dome, try to build another things around it
and combined.


Image 04


Taraaa!!
on the above image i have put four pole, and make a floor and arrange it like a stairs.
The lasr step, setting the material, make suitable with the building structure ang add some lighting on it.insyALLAH_it will be look nice..:)

gud luck
thanks

TEST 1 - chair & table


Asslamualaikum
ni nak terangkan sikek pasal gamba yang kat atas tu..:D
gamba kat atas tu telah diberi oleh my lecture untuk first test subjek ni..hehe
(subjek Computer Aided Design)
kitorang wajib buat same as on the picture above
untuk dapatkan markah yang lebih, lagi BANYAK...:)
insyALLAH
but i not brilliant as much that u were thought,
i'm just maked as i well-to-do
yang dibawah ni adalah
antara-antara bukti, that i had done

ianya sekali dengan buat ruang bilik


JPEG 1

JPEG 2

JPEG 3

JPEG 4

itu sahaja...
yang dapat saya tunjuk kan.
agak susah jugak unuk saya buat kusi ni aritu...hhhehe..
but, its nevermind, cobaan adalah perkara yang terbaek.

anyway
thanks again

just want to SHARE


...insyALLAH...

making SNOWMAN


on the first week, in this semester 4
second year in diploma industrial design
the first thing where i have learned is
on how to maked a SNOWMAN
using???
AutoDesk 3Ds Max
:)

the points is
simple
it is only related by using the basic STANDARD PRIMITIVE
addition, I'm also have use LOFT
for SNOWMAN hand's


there are only have some pic to show 
i not have many time to saved more 
coz, at that time.my class was time's up
 anyway
thanks

New Blogger

Assalamualaikum
here
new BLOG, new LOOK
Starting to make a 3ds design
by using 3ds Max Studio 2009


bE crEativE!!!

Related Posts Plugin for WordPress, Blogger...